
In part 2 you toured the control plane and the nodes and followed one kubectl apply until a container ran. So far we have used a cluster without asking how it got there. This part builds your permanent lab. By the end you will have kubectl and kind installed and checksum-verified, you will know when minikube, k3d or Docker Desktop is the better fit, you will run a three-node cluster from a config file, and you will understand kubeconfig and contexts, the files and names that decide which cluster each command hits. You need a Linux, macOS or Windows machine with Docker (or Podman) and a few GB of free memory.
What you will build
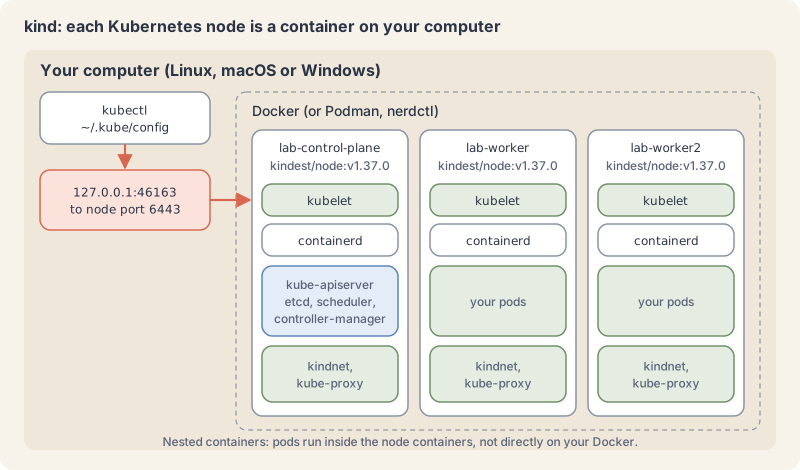
Two kind clusters side by side: first, a single node, and lab, with one control-plane node and two workers. You will switch between them, point a context at a default namespace, merge kubeconfig files, and then delete both cleanly. Remember the picture from part 2: a cluster is a control plane plus nodes. With kind, each of those nodes is simply a container on your computer, and the Pods run as containers inside it.
Four ways to run a learning cluster
You do not need a cloud account to learn Kubernetes. Four tools cover nearly every laptop:
- kind (Kubernetes in Docker) runs each node as a container on Docker, Podman or nerdctl, and bootstraps it with kubeadm, the upstream installer. It was built to test Kubernetes itself, starts in well under a minute, supports several nodes from a small config file, and picks the Kubernetes version by node image. This series uses it for every lab.
- minikube runs a cluster in a virtual machine, a container or directly on the host, depending on the driver you choose (Docker, KVM2, VirtualBox, QEMU, Hyper-V, VFkit and others). It asks for 2 CPUs, 2 GB of free memory and 20 GB of disk, supports several nodes with
--nodes, and has an add-on catalogue (minikube addons list). It is a good choice if you want a VM-based lab or its add-ons. - k3d runs k3s in Docker. k3s is a lightweight, fully compliant Kubernetes distribution in a single binary of under 100 MB, made for edge, home labs and CI. k3d is a community project, not an official Rancher (SUSE) product. Part 53 covers k3s.
- Docker Desktop has a built-in cluster you switch on in its settings. It offers two provisioners: kubeadm (one node, with the Kubernetes version set by Docker Desktop) and kind (several nodes, version of your choice). Check the licence first: Docker Desktop is free for personal use, education, non-commercial open source and small businesses (fewer than 250 employees and less than $10 million in annual revenue); professional use in larger organizations and government entities needs a paid subscription.
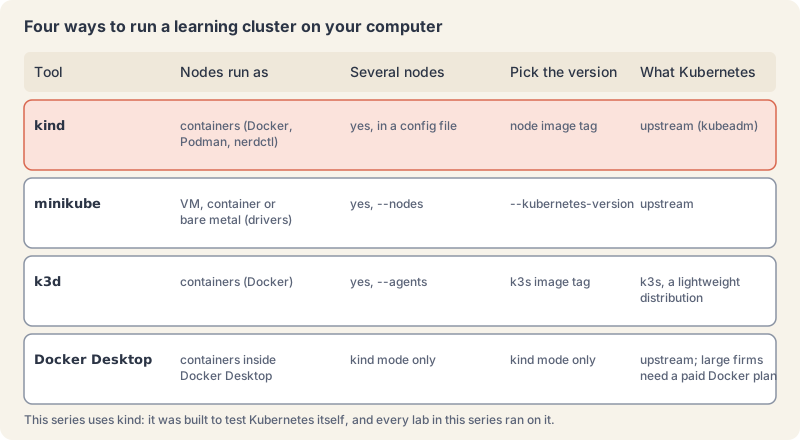
Every one of them gives you a real API server, so everything in this series works on any of them. The commands to create and delete clusters differ; kubectl and kubeconfig work the same way.
kubectl and the one-minor-version rule
kubectl is a single binary with no dependencies. The version skew policy says kubectl is supported within one minor version, older or newer, of the API server. kubectl 1.37 works with API servers 1.36, 1.37 and 1.38. When you upgrade clusters, upgrade kubectl too. kubectl version prints both versions.
kubeconfig: how kubectl knows where to go
A kubeconfig file tells kubectl how to reach clusters and how to log in to them (kubeconfig docs). The name is generic: the default file is $HOME/.kube/config. It holds three lists and one pointer:
clusters: a name, the API server address (server) and the certificate authority used to trust it.users: a name and the credentials, for kind a client certificate and key. In clouds this is usually a plugin that fetches a token, which the AKS and EKS arcs cover.contexts: a name that joins one cluster, one user and an optional default namespace.current-context: the context kubectl uses when you do not pass--context.
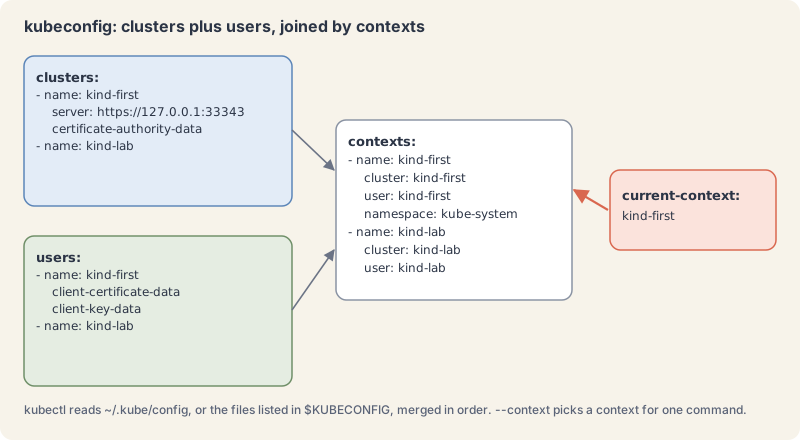
kubectl picks its configuration in this order: the --kubeconfig flag if you pass one, otherwise the files listed in the KUBECONFIG environment variable (colon-separated on Linux and macOS, semicolon on Windows) merged together, otherwise $HOME/.kube/config. When files are merged, the first file to set a value wins. kind create cluster adds its cluster, user and context to your kubeconfig and switches current-context to the new cluster; kind delete cluster removes them again.
Two safety notes. A kubeconfig is a credential: anyone with your kind file is admin on that cluster, so keep it private (chmod 600). And the Kubernetes docs warn to use kubeconfig files only from trusted sources, because a crafted file can run code on your machine; read an unknown one the way you would read a shell script.
Try it: build the lab
Every command ran on our box on 10 November 2026. Ports, IDs and timings will differ on yours.
1. Install kubectl and check its checksum. These lines pin kubectl v1.37.2, the client this lab printed. To see the latest stable release, run curl -L -s https://dl.k8s.io/release/stable.txt. On 10 November 2026 that file printed v1.37.2. These are the official Linux steps for x86-64 (use arm64 in the URLs on ARM; on a Mac, brew install kubectl works):
curl -LO "https://dl.k8s.io/release/v1.37.2/bin/linux/amd64/kubectl"
curl -LO "https://dl.k8s.io/release/v1.37.2/bin/linux/amd64/kubectl.sha256"
echo "$(cat kubectl.sha256)  kubectl" | sha256sum --check
chmod +x kubectl && sudo mv kubectl /usr/local/bin/
kubectl version --clientExplain this command
curl -LO "https://dl.k8s.io/release/v1.37.2/bin/linux/amd64/kubectl"
curl -LO "https://dl.k8s.io/release/v1.37.2/bin/linux/amd64/kubectl.sha256"
echo "$(cat kubectl.sha256)  kubectl" | sha256sum --check
chmod +x kubectl && sudo mv kubectl /usr/local/bin/
kubectl version --clientcurlThe curl client. These install lines follow the kubectl install page.-LOTwo curl options written together. -L follows redirects. -O, --remote-name, writes the body to a local file named like the remote file."https://dl.k8s.io/release/v1.37.2/bin/linux/amd64/kubectl"The kubectl URL, in quotes. It pins kubectl v1.37.2, the Linux amd64 binary. The install page uses stable.txt when you want the latest stable release instead.curlThe curl client. These install lines follow the kubectl install page.-LOFollow redirects and save the file under its remote name. This download is the checksum file, kubectl.sha256."https://dl.k8s.io/release/v1.37.2/bin/linux/amd64/kubectl.sha256"The checksum URL for that same kubectl v1.37.2 binary. The install page checks the binary against this file.echoShell. Writes its arguments to standard output. Here the pipe sends that line to sha256sum."$(cat kubectl.sha256) kubectl"The line sha256sum checks, in quotes. $(cat kubectl.sha256) pastes the published checksum. Two spaces and the name kubectl follow, which is the form the install page pipes to sha256sum --check.|Shell. Sends the previous command's standard output to the next command.sha256sumComputes or checks SHA-256 checksums. The install page uses it to verify the download.--checkRead checksums and compare them with the files. The install page says a match prints OK.chmodChanges file permissions.+xAdds the execute permission.kubectlThe file chmod marks executable.&&Shell. Runs the next command only if the previous command succeeded.sudoRuns the next command with superuser privileges, which writing into /usr/local/bin needs.mvMoves the file into the destination directory.kubectlThe binary being moved./usr/local/bin/The destination directory, on a normal PATH.kubectlThe Kubernetes command-line client. Subcommands and flags are documented under kubernetes.io/docs/reference/kubectl/.versionPrint the client and server version information for the current context.--clientIf true, shows client version only. No server is required.
kubectl: OK
Client Version: v1.37.2
Kustomize Version: v5.8.1
kubectl: OK means the binary matches the published checksum. If you see FAILED, download both files again.
2. Install kind and check its checksum. From the kind quick start, plus the checksum file from the v0.33.0 release. Linux x86-64 uses kind-linux-amd64, Linux arm64 uses kind-linux-arm64, and Apple silicon uses kind-darwin-arm64. The checksum file matches that binary. On a Mac, brew install kind also works:
[ "$(uname -s)-$(uname -m)" = Linux-x86_64 ] && KIND_FILE=kind-linux-amd64
[ "$(uname -s)-$(uname -m)" = Linux-aarch64 ] && KIND_FILE=kind-linux-arm64
[ "$(uname -s)-$(uname -m)" = Darwin-arm64 ] && KIND_FILE=kind-darwin-arm64
curl -Lo ./kind "https://kind.sigs.k8s.io/dl/v0.33.0/${KIND_FILE}"
curl -Lo kind.sha256sum "https://github.com/kubernetes-sigs/kind/releases/download/v0.33.0/${KIND_FILE}.sha256sum"
echo "$(cut -d' ' -f1 kind.sha256sum)  kind" | sha256sum --check
chmod +x kind && sudo mv kind /usr/local/bin/
kind versionExplain this command
[ "$(uname -s)-$(uname -m)" = Linux-x86_64 ] && KIND_FILE=kind-linux-amd64
[ "$(uname -s)-$(uname -m)" = Linux-aarch64 ] && KIND_FILE=kind-linux-arm64
[ "$(uname -s)-$(uname -m)" = Darwin-arm64 ] && KIND_FILE=kind-darwin-arm64
curl -Lo ./kind "https://kind.sigs.k8s.io/dl/v0.33.0/${KIND_FILE}"
curl -Lo kind.sha256sum "https://github.com/kubernetes-sigs/kind/releases/download/v0.33.0/${KIND_FILE}.sha256sum"
echo "$(cut -d' ' -f1 kind.sha256sum)  kind" | sha256sum --check
chmod +x kind && sudo mv kind /usr/local/bin/
kind version
[ "$(uname -s)-$(uname -m)" = Linux-x86_64 ] && KIND_FILE=kind-linux-amd64test, written [ … ], compares two strings: uname -s prints the operating system and uname -m the hardware name. && runs the assignment only if the test passes. On Linux x86-64 this sets KIND_FILE to kind-linux-amd64, the v0.33.0 release asset.[ "$(uname -s)-$(uname -m)" = Linux-aarch64 ] && KIND_FILE=kind-linux-arm64The same test for Linux arm64. It sets KIND_FILE to kind-linux-arm64. The v0.33.0 release publishes that asset.[ "$(uname -s)-$(uname -m)" = Darwin-arm64 ] && KIND_FILE=kind-darwin-arm64The same test for Apple silicon. Darwin is the macOS kernel name, and arm64 is the hardware name. It sets KIND_FILE to kind-darwin-arm64.curlThe curl client. These install lines follow the kind quick start and the v0.33.0 release.-LoFollow redirects, and write the body to the file named by -o../kindThe file named by -o."https://kind.sigs.k8s.io/dl/v0.33.0/${KIND_FILE}"The kind v0.33.0 binary named by KIND_FILE. The quick start publishes one URL per architecture.curlThe curl client.-LoFollow redirects and write the body to the named file.kind.sha256sumThe file named by -o. It is the checksum file for the binary just chosen."https://github.com/kubernetes-sigs/kind/releases/download/v0.33.0/${KIND_FILE}.sha256sum"The checksum file that matches KIND_FILE. The v0.33.0 release publishes kind-linux-amd64.sha256sum, kind-linux-arm64.sha256sum and kind-darwin-arm64.sha256sum.echoWrites a checksum line to the pipe."$(cut -d' ' -f1 kind.sha256sum) kind"The line sha256sum checks. cut -d sets the field separator to a space, and -f1 prints the first field, which is the checksum. Two spaces and the name kind follow.|Shell. Sends the previous command's standard output to the next command.sha256sumChecks the SHA-256 checksum.--checkCompare the checksums it reads with the files. A match prints OK.chmodChanges file permissions.+xAdds the execute permission.kindThe file chmod marks executable.&&Shell. Runs the next command only if the previous command succeeded.sudoRuns the next command with superuser privileges.mvMoves the file into the destination directory.kindThe binary being moved./usr/local/bin/The destination directory.kindThe kind client.versionPrints the kind CLI version.
If KIND_FILE is empty, these binaries do not cover your operating system and hardware.
kind: OK
kind v0.33.0 go1.26.7 linux/amd64
Our machine was x86-64, so the version line says linux/amd64. Linux arm64 says linux/arm64, and Apple silicon says darwin/arm64.
We ran these lines on Linux x86-64. On a Mac, check the file with echo "$(cut -d' ' -f1 kind.sha256sum) kind" | shasum -a 256 --check, or use brew install kind.
3. Create your first cluster.
kind create cluster --name first
kubectl get nodesExplain this command
kind create cluster --name first
kubectl get nodeskindThe kind client.createThe kind command group for creating things.clusterCreates a local Kubernetes cluster. kind's own description says it uses container nodes. The quick start says kind can use Docker, Podman or nerdctl.--nameSets the cluster name. kind says this overrides KIND_CLUSTER_NAME and the config, and that the default name is kind.firstThe cluster name. kind prefixes the kubectl context with kind-, so the context is kind-first.kubectlThe Kubernetes command-line client. Subcommands and flags are documented under kubernetes.io/docs/reference/kubectl/.getDisplay one or many resources. kubectl get prints a table of the most important information about the resources you name.nodesThe resource type to display. kubectl get points you to kubectl api-resources for the full list of types the server supports.
Creating cluster "first" ...
...
Set kubectl context to "kind-first"
...
NAME                  STATUS     ROLES           AGE   VERSION
first-control-plane   NotReady   control-plane   4s    v1.37.0
NotReady right after creation is normal: the network plugin is still starting. A few seconds later the node is Ready. Note the context name: kind prefixes the cluster name with kind-.
4. Create a three-node cluster from a config file. kind reads a small YAML file (kind configuration). Save this as kind-lab.yaml:
kind: Cluster
apiVersion: kind.x-k8s.io/v1alpha4
name: lab
nodes:
  - role: control-plane
  - role: worker
- role: workerkind create cluster --config kind-lab.yaml
kubectl get nodesExplain this command
kind create cluster --config kind-lab.yaml
kubectl get nodeskindThe kind client.createThe kind command group for creating things.clusterCreates a local Kubernetes cluster. kind's own description says it uses container nodes. The quick start says kind can use Docker, Podman or nerdctl.--configPath to a kind config file. The kind configuration page shows kind create cluster --config=config.yaml.kind-lab.yamlThe config file. The lesson saves it with name lab, one control-plane node and two workers.kubectlThe Kubernetes command-line client. Subcommands and flags are documented under kubernetes.io/docs/reference/kubectl/.getDisplay one or many resources. kubectl get prints a table of the most important information about the resources you name.nodesThe resource type to display. kubectl get points you to kubectl api-resources for the full list of types the server supports.
Creating cluster "lab" ...
...
 ✓ Joining worker nodes 🚜
Set kubectl context to "kind-lab"
...
NAME                STATUS   ROLES           AGE   VERSION
lab-control-plane   Ready    control-plane   23s   v1.37.0
lab-worker          Ready    <none>          13s   v1.37.0
lab-worker2         Ready    <none>          13s   v1.37.0
kind v0.33.0 defaults to Kubernetes v1.37.0. To pin a version, add --image with a node image from the release notes, which also list 1.36.4, 1.35.8 and 1.34.11. The notes ask you to use the full @sha256 digest to get an image built for that kind release:
kind create cluster --name pinned --image kindest/node:v1.37.0@sha256:a1ed56cfb0e7b93589bdf97c8cd566405a265939e3620fc4f5de89adff580ae5
kind delete cluster --name pinnedExplain this command
kind create cluster --name pinned --image kindest/node:v1.37.0@sha256:a1ed56cfb0e7b93589bdf97c8cd566405a265939e3620fc4f5de89adff580ae5
kind delete cluster --name pinnedkindThe kind client.createThe kind command group for creating things.clusterCreates a local Kubernetes cluster. kind's own description says it uses container nodes. The quick start says kind can use Docker, Podman or nerdctl.--nameSets the cluster name. The default name is kind.pinnedThe cluster name passed to --name.--imageNode docker image to use for booting the cluster. The kind quick start says a different image changes the Kubernetes version.kindest/node:v1.37.0@sha256:a1ed56cfb0e7b93589bdf97c8cd566405a265939e3620fc4f5de89adff580ae5The image name and digest. kind's release notes ask you to use the full @sha256 digest so you get the image built for that kind release.kindThe kind client.deleteThe kind command group for deleting things.clusterDeletes a kind cluster. kind says this is idempotent: if the cluster is already gone, the command returns success.--nameThe cluster name. If you omit it, kind deletes the default cluster, named kind.pinnedThe cluster name passed to --name.
Creating cluster "pinned" ...
 ✓ Ensuring node image (kindest/node:v1.37.0) 🖼️
...
Set kubectl context to "kind-pinned"
...
Deleting cluster "pinned" ...
Deleted nodes: ["pinned-control-plane"]
5. See that nodes are containers.
docker ps --format 'table {{.Names}}\t{{.Image}}\t{{.Ports}}'Explain this command
docker ps --format 'table {{.Names}}\t{{.Image}}\t{{.Ports}}'dockerThe docker client. The lesson uses it because a kind node is a Docker container.psList containers. kind nodes show up here because each node is a container.--formatFormat the output with a custom template. The docker ps docs say a value that starts with table prints a table using the template that follows.'table {{.Names}}\t{{.Image}}\t{{.Ports}}'The template, in single quotes. table asks for column headers. {{.Names}}, {{.Image}} and {{.Ports}} are fields of each container. \t is a tab between columns.
NAMES                         IMAGE                  PORTS
lab-worker                    kindest/node:v1.37.0
lab-control-plane             kindest/node:v1.37.0   127.0.0.1:46163->6443/tcp
lab-worker2                   kindest/node:v1.37.0
first-control-plane           kindest/node:v1.37.0   127.0.0.1:33343->6443/tcp
...
Only the control-plane containers publish a port: the API server’s 6443, mapped to a random port on 127.0.0.1. Inside a worker, containerd runs that node’s system Pods:
docker exec lab-worker crictl psExplain this command
docker exec lab-worker crictl psdockerThe docker client. The lesson uses it because a kind node is a Docker container.execdocker exec runs a command in a running container. This line passes no docker flags.lab-workerThe container name. It is the kind worker node from this lesson.crictlA debugging client for a CRI runtime. The lesson runs the copy that is already inside the node.psList containers. The crictl command list names ps as the command that lists containers.
CONTAINER           IMAGE               CREATED             STATE               NAME                ATTEMPT             POD ID              POD                 NAMESPACE
61acf40edfc3a       4626fe10df5b9       11 seconds ago      Running             kindnet-cni         0                   fce9468a46c4f       kindnet-8bxs7       kube-system
c4e84dd24d968       d6a28daf3e6b0       11 seconds ago      Running             kube-proxy          0                   eeddac91691b2       kube-proxy-9h6c7    kube-system
kind get clusters lists your clusters and kind get nodes --name lab lists one cluster’s node containers.
6. Read your kubeconfig through kubectl. You now have two contexts; the star marks the current one:
kubectl config get-contextsExplain this command
kubectl config get-contextskubectlThe Kubernetes command-line client. Subcommands and flags are documented under kubernetes.io/docs/reference/kubectl/.configThe command group for kubeconfig entries: contexts, clusters and users.get-contextsDisplay one or many contexts from the kubeconfig file. The examples start with listing every context.
CURRENT   NAME         CLUSTER      AUTHINFO     NAMESPACE
          kind-first   kind-first   kind-first
*         kind-lab     kind-lab     kind-lab
Switch, or target a cluster for one command only:
kubectl config use-context kind-first
kubectl get nodes
kubectl get nodes --context kind-labExplain this command
kubectl config use-context kind-first
kubectl get nodes
kubectl get nodes --context kind-labkubectlThe Kubernetes command-line client. Subcommands and flags are documented under kubernetes.io/docs/reference/kubectl/.configThe command group for kubeconfig entries.use-contextSet the current-context in a kubeconfig file. The synopsis is kubectl config use-context CONTEXT_NAME.kind-firstThe context name. The lesson's get-contexts output lists it.kubectlThe Kubernetes command-line client. Subcommands and flags are documented under kubernetes.io/docs/reference/kubectl/.getDisplay one or many resources. kubectl get prints a table of the most important information about the resources you name.nodesThe resource type to display. kubectl get points you to kubectl api-resources for the full list of types the server supports.kubectlThe Kubernetes command-line client. Subcommands and flags are documented under kubernetes.io/docs/reference/kubectl/.getDisplay one or many resources. kubectl get prints a table of the most important information about the resources you name.nodesThe resource type to display. kubectl get points you to kubectl api-resources for the full list of types the server supports.--contextThe name of the kubeconfig context to use. This flag is inherited by kubectl commands, and it applies to this one command.kind-labThe context name passed to --context. The lesson uses it to read the other cluster without changing current-context.
Switched to context "kind-first".
NAME                  STATUS   ROLES           AGE   VERSION
first-control-plane   Ready    control-plane   13m   v1.37.0
NAME                STATUS   ROLES           AGE   VERSION
lab-control-plane   Ready    control-plane   23s   v1.37.0
lab-worker          Ready    <none>          13s   v1.37.0
lab-worker2         Ready    <none>          13s   v1.37.0
--minify shows only what the current context uses. kubectl hides the certificate data unless you add --raw, so this is safe to paste into a ticket:
kubectl config view --minifyExplain this command
kubectl config view --minifykubectlThe Kubernetes command-line client. Subcommands and flags are documented under kubernetes.io/docs/reference/kubectl/.configThe command group for kubeconfig entries.viewDisplay merged kubeconfig settings or a specified kubeconfig file. The docs say you can add --output jsonpath={...} to extract one value.--minifyRemove all information not used by current-context from the output. The lesson uses it so the printout shows only the context you are on.
apiVersion: v1
clusters:
- cluster:
    certificate-authority-data: DATA+OMITTED
    server: https://127.0.0.1:33343
  name: kind-first
contexts:
- context:
    cluster: kind-first
    user: kind-first
  name: kind-first
current-context: kind-first
kind: Config
users:
- name: kind-first
  user:
    client-certificate-data: DATA+OMITTED
    client-key-data: DATA+OMITTED
7. Give a context a default namespace. Commands without -n then go to that namespace. Here we point it at kube-system to make the effect visible, then set it back:
kubectl config set-context --current --namespace=kube-system
kubectl get pods
kubectl config set-context --current --namespace=default
kubectl get podsExplain this command
kubectl config set-context --current --namespace=kube-system
kubectl get pods
kubectl config set-context --current --namespace=default
kubectl get podskubectlThe Kubernetes command-line client. Subcommands and flags are documented under kubernetes.io/docs/reference/kubectl/.configThe command group for kubeconfig entries.set-contextSet a context entry in kubeconfig. The docs say that if the name already exists, new fields merge on top of the existing values for those fields.--currentModify the current context. The synopsis allows NAME or --current.--namespace=kube-systemThe namespace for the context entry. The short form is -n. The value here is kube-system, so later commands that omit -n use that namespace.kubectlThe Kubernetes command-line client. Subcommands and flags are documented under kubernetes.io/docs/reference/kubectl/.getDisplay one or many resources. kubectl get prints a table of the most important information about the resources you name.podsThe resource type to display. kubectl get points you to kubectl api-resources for the full list of types the server supports.kubectlThe Kubernetes command-line client. Subcommands and flags are documented under kubernetes.io/docs/reference/kubectl/.configThe command group for kubeconfig entries.set-contextSet a context entry in kubeconfig, merging onto the fields you name.--currentModify the current context.--namespace=defaultSets the context's namespace back to default.kubectlThe Kubernetes command-line client. Subcommands and flags are documented under kubernetes.io/docs/reference/kubectl/.getDisplay one or many resources. kubectl get prints a table of the most important information about the resources you name.podsThe resource type to display. kubectl get points you to kubectl api-resources for the full list of types the server supports.
Context "kind-first" modified.
NAME                                          READY   STATUS    RESTARTS      AGE
coredns-559f6c778d-7nsb2                      1/1     Running   0             13m
...
kube-scheduler-first-control-plane            1/1     Running   0             13m
Context "kind-first" modified.
No resources found in default namespace.
8. Keep clusters in separate files and merge them on demand. kind get kubeconfig prints one cluster’s kubeconfig. With KUBECONFIG listing several files, kubectl sees them as one:
kind get kubeconfig --name first > first.kubeconfig
kind get kubeconfig --name lab > lab.kubeconfig
chmod 600 first.kubeconfig lab.kubeconfig
KUBECONFIG=first.kubeconfig:lab.kubeconfig kubectl config get-contextsExplain this command
kind get kubeconfig --name first > first.kubeconfig
kind get kubeconfig --name lab > lab.kubeconfig
chmod 600 first.kubeconfig lab.kubeconfig
KUBECONFIG=first.kubeconfig:lab.kubeconfig kubectl config get-contextskindThe kind client.getThe kind command group for reading cluster information.kubeconfigPrints cluster kubeconfig. kind writes it to standard output.--nameThe cluster context name. kind's default name is kind.firstThe cluster name passed to --name.>Shell. Writes the command's standard output to the file that follows, replacing that file.first.kubeconfigThe file that receives the kubeconfig.kindThe kind client.getThe kind command group for reading cluster information.kubeconfigPrints cluster kubeconfig.--nameThe cluster context name.labThe cluster name passed to --name.>Shell. Writes the command's standard output to the file that follows, replacing that file.lab.kubeconfigThe file that receives this cluster's kubeconfig.chmodChanges file permissions.600Owner can read and write. Group and everyone else have no permission. The lesson says a kubeconfig is a credential, so keep it private with chmod 600.first.kubeconfigOne of the two files chmod changes.lab.kubeconfigThe other file chmod changes.KUBECONFIG=first.kubeconfig:lab.kubeconfigSets the KUBECONFIG variable for this one command. The kind quick start says that when KUBECONFIG is set, it is a list of paths, merged, using your system's path separator. On Linux that separator is a colon.kubectlThe Kubernetes command-line client. Subcommands and flags are documented under kubernetes.io/docs/reference/kubectl/.configThe command group for kubeconfig entries.get-contextsDisplay one or many contexts from the kubeconfig file. With KUBECONFIG set, kubectl reads the merged files.
CURRENT   NAME         CLUSTER      AUTHINFO     NAMESPACE
*         kind-first   kind-first   kind-first
          kind-lab     kind-lab     kind-lab
The first file set current-context, so it wins. To save a merged copy as one file, add kubectl config view --flatten > merged.kubeconfig. Separate files per cluster are a good habit: a shell that only has KUBECONFIG=lab.kubeconfig cannot touch any other cluster by mistake.
9. Delete the clusters.
kind delete cluster --name lab
kind delete cluster --name first
kubectl config get-contextsExplain this command
kind delete cluster --name lab
kind delete cluster --name first
kubectl config get-contextskindThe kind client.deleteThe kind command group for deleting things.clusterDeletes a kind cluster. kind says this is idempotent: deleting a cluster that does not exist returns success.--nameThe cluster name. If you omit it, kind deletes the default cluster, named kind.labThe cluster name passed to --name.kindThe kind client.deleteThe kind command group for deleting things.clusterDeletes a kind cluster.--nameThe cluster name.firstThe cluster name passed to --name.kubectlThe Kubernetes command-line client. Subcommands and flags are documented under kubernetes.io/docs/reference/kubectl/.configThe command group for kubeconfig entries.get-contextsDisplay one or many contexts from the kubeconfig file. The lesson's output is empty after both deletes.
Deleting cluster "lab" ...
Deleted nodes: ["lab-worker" "lab-control-plane" "lab-worker2"]
Deleting cluster "first" ...
Deleted nodes: ["first-control-plane"]
CURRENT   NAME   CLUSTER   AUTHINFO   NAMESPACE
kind removed both contexts from your kubeconfig. Deleting a cluster that does not exist is not an error, so cleanup scripts can run it safely.
10. Create the cluster part 4 uses. Step 9 removed both clusters. The rest of the series, including part 4, needs one named k8s-from-zero:
kind create cluster --name k8s-from-zeroExplain this command
kind create cluster --name k8s-from-zerokindThe kind client.createThe kind command group for creating things.clusterCreates a local Kubernetes cluster. kind's own description says it uses container nodes.--nameSets the cluster name. kind says this overrides KIND_CLUSTER_NAME and the config, and that the default name is kind.k8s-from-zeroThe cluster name. Part 4 and the rest of the series use this cluster. kind prefixes the kubectl context with kind-.
Use the three-node config instead if your machine has the memory.
On our box we ran everything with a separate KUBECONFIG file, because other clusters share that machine. Docker there runs without iptables, so we also added the control-plane name to the workers’ /etc/hosts and allowed bridge traffic between node containers before the three-node cluster could join. A normal Docker or Podman install needs none of this.
When it goes wrong
A multi-node cluster fails at “Preparing nodes”. Our first three-node attempt stopped with:
 ✗ Preparing nodes 📦 📦 📦
Deleted nodes: ["lab-control-plane" "lab-worker2" "lab-worker"]
ERROR: failed to create cluster: could not find a log line that matches "Reached target .*Multi-User System.*|detected cgroup v1"
The kind known issues page explains it: Linux limits on inotify instances and watches (on Ubuntu 128 and 8192 by default) are too low for many nodes. Raise them, then create the cluster again:
sudo sysctl fs.inotify.max_user_instances=512
sudo sysctl fs.inotify.max_user_watches=524288Explain this command
sudo sysctl fs.inotify.max_user_instances=512
sudo sysctl fs.inotify.max_user_watches=524288sudoRuns the next command with superuser privileges. Setting these kernel parameters needs that.sysctlReads or writes kernel parameters. The kind known issues page uses it to raise inotify limits on the host.fs.inotify.max_user_instances=512The parameter and the value. The known issues page says Ubuntu's default of 128 is too low for many nodes, and it shows 512.sudoRuns the next command with superuser privileges.sysctlWrites a kernel parameter.fs.inotify.max_user_watches=524288The watches limit. The same page says Ubuntu's default is 8192 and shows 524288.
The connection to the server 127.0.0.1:46163 was refused. kubectl points at a cluster that is not running, usually a kubeconfig file or context that outlived its cluster. We got this from the saved lab.kubeconfig after deleting lab. Check kubectl config current-context, then switch context or recreate the cluster.
The connection to the server localhost:8080 was refused. kubectl found no current context at all, so it fell back to localhost:8080. After we deleted both clusters, kubectl config current-context said error: current-context is not set. Create a cluster, or run kubectl config use-context <name>.
A command went to the wrong cluster. This is the most expensive mistake in this list, and kubectl will not warn you. Before any change, run kubectl config current-context; pass --context in scripts; and keep production credentials in a separate kubeconfig that is not in your default KUBECONFIG. Part 23 covers tools for switching contexts and namespaces safely.
kubectl and the cluster are too far apart. If kubectl version shows a client more than one minor version away from the server, some commands may misbehave. Install a kubectl that matches, per the version skew policy.
Cheat sheet
| Task | Command or field | Note |
|---|---|---|
| Latest stable kubectl version | curl -L -s https://dl.k8s.io/release/stable.txt |
v1.37.2 on 10 Nov 2026 |
| Verify a download | echo "$(cat kubectl.sha256) kubectl" | sha256sum --check |
must print OK |
| Client and server versions | kubectl version |
keep within one minor version |
| Create a cluster | kind create cluster --name <name> |
context is kind-<name> |
| Multi-node cluster | kind create cluster --config kind-lab.yaml |
roles: control-plane, worker |
| Pin the Kubernetes version | --image kindest/node:v1.37.0@sha256:... |
digests are in the kind release notes |
| List clusters and nodes | kind get clusters, kind get nodes --name <name> |
nodes are Docker containers |
| Delete a cluster | kind delete cluster --name <name> |
also removes its context |
| List contexts | kubectl config get-contexts |
* marks the current one |
| Show the current context | kubectl config current-context |
run it before every change |
| Switch context | kubectl config use-context kind-lab |
changes the kubeconfig file |
| One command, other cluster | kubectl get nodes --context kind-lab |
safest in scripts |
| Default namespace for a context | kubectl config set-context --current --namespace=<ns> |
applies to commands without -n |
| Show config without secrets | kubectl config view --minify |
--raw would print the keys |
| One cluster’s kubeconfig | kind get kubeconfig --name lab > lab.kubeconfig |
then chmod 600 |
| Merge files | KUBECONFIG=a.kubeconfig:b.kubeconfig kubectl config view --flatten |
first file wins on conflicts |
# kind-lab.yaml: one control plane, two workers
kind: Cluster
apiVersion: kind.x-k8s.io/v1alpha4
name: lab
nodes:
  - role: control-plane
  - role: worker
  - role: worker
Recap and what is next
- kind runs each Kubernetes node as a container and bootstraps it with kubeadm; it is the lab for this series. minikube, k3d and Docker Desktop are good alternatives with different trade-offs.
- Install kubectl and kind from the official URLs and check their checksums; keep kubectl within one minor version of your clusters.
- A kubeconfig holds clusters, users and contexts;
current-contextdecides where commands go, and--contextoverrides it for one command. KUBECONFIGcan list several files, which kubectl merges; separate files per cluster limit mistakes.- Errors like
connection refusedusually mean a stale context, not a broken cluster.
Next: Kubernetes from Zero, part 4: Your first Pod.
Command explanations and quoted passages in this lesson come from or adapt the kubectl reference and the Kubernetes documentation, © The Kubernetes Authors, licensed under CC BY 4.0. We shortened and edited some passages. Kubernetes® is a registered trademark of The Linux Foundation. aitamer.news is not affiliated with or endorsed by The Linux Foundation or the CNCF.
The Campfire
CommentsThanks. Your comment is waiting for the desk. Once it is approved it appears here within about a minute.
Add a comment